
Hello there! Nope, I didn’t fall off the face of the earth. Actually, I did a bit of crafting, but I haven’t gotten around to blogging about it in awhile. (How other bloggers manage to post all the time is beyond me!) Here’s a craft that I wanted to post about though, because it’s pretty quick and turns out so cute — and maybe for once I will post something AHEAD of the holiday it’s meant for. 🙂
What you’ll need:
– A wreath form (see below)
– Yarn (gray) – One skein is plenty– I bought three, oh well!
– Felt, any colors you want
I got the original idea off of a picture on Pinterest, from an Esty seller. It had me at argyle. I LOVE ARGYLE. It’s probably my favorite pattern, followed by plaid. (Try as I might, I never got into the whole chevron thing that’s such a craze lately.)
It seemed simple enough to duplicate, so I went for it. It’s your basic yarn-wrapped wreath form, to start. You can get those foam forms at the craft store, though they never come in large enough sizes for my tastes. Some people like to use pool noodles or foam from Home Depot, and turn it into a circle and tape the ends together, to make their form. Then it can be any size you wish, but, I’m not sure how stable it ends up being. I’ve made wreaths before using coat hangers for the shape, and unfortunately the wire wasn’t strong enough to support the final wreath, and it ended up sagging a lot. Bending it back seemed to help, but it still bugs me.
So, I tried something else – I used one of those green wire floral wreath frames as the base, and wrapped it in foam to make it nice and thick. I used tape around the foam to hold it in place and even out any lumps. It didn’t end up completely uniform but it looks just lumpy enough to look more homemade…. yeah.. It is, however, very very rigid, and isn’t going to sag.
Then I wrapped that with some strips of felt, for something the yarn could “grip” and to further bulk up the wreath and smooth it out. Also, the color was close to my yarn color, which helps with any gaps that might show.
The next part was wrapping with yarn. Okay, that’s a very boring step. It takes a long time, so it’s advisable to sit in front of a tv and do a mini-marathon on Netflix. (Doctor Who, anyone?) My arms hurt a little after that part. For the yarn, I used the Red Heart Super Saver yarn from Jo-Ann’s in Heather Gray.
Once you get completely around the wreath, go back and fill in any gaps with more yarn.
Next, you’ll want to cut out heart shapes from felt. I made a quick little heart template and traced it so they would all be roughly the same shape and size. Lay them out so that they alternate between facing in and facing out. Alternate colors however you want. (I don’t think there’s a wrong way to do this.)
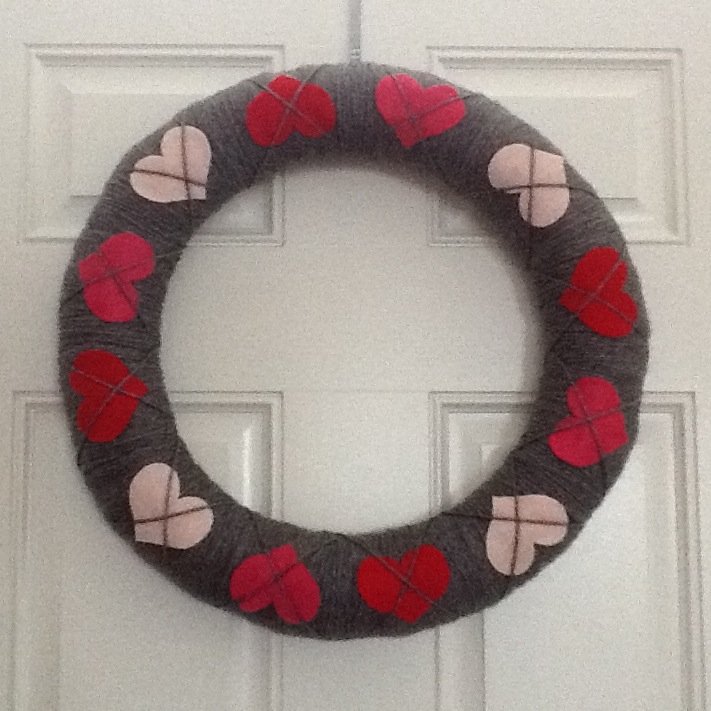
Once you like your layout, glue the hearts down with some dots of fabric glue to stabilize them. Then, go back to your yarn and start on the side of one of your hearts. Wrap diagonally across the heart, and go on to the next one in the same direction. Once you’ve gone all the way around, stop and go back around in the other direction around the wreath, to make the cross across each heart. I found it easiest to position my yarn if I did one straight loop (matching the wrapped-yarn) between each heart.
Hope that made sense, as I did this late at night and didn’t take pictures of the steps.
You’re done! Attach a loop however you want. Use red ribbon for it to stand out, or use more of your yarn to make it invisible.
Happy Valentine’s Day!